How to Perform Memory Forensic Analysis in macOS Using Volatility 3

Introduction
Memory forensic analysis is an intricate and challenging aspect of cybersecurity, one that becomes increasingly crucial as cyber threats evolve. In earlier discussions, I introduced the installation of Volatility 3, a cutting-edge tool in the realm of digital forensics. This powerful utility has already guided us through the complexities of analyzing memory dumps on Windows 11 and Linux systems, offering insights into the often-obscure inner workings of operating systems under duress.
Today, we extend our forensic journey into the domain of macOS. This proprietary operating system, known for its robust security features and widespread use among professionals, presents a unique set of challenges for memory analysis. Despite its fortified architecture, no system is impervious to intrusion, and thus, understanding how to meticulously dissect macOS memory dumps is a critical skill for any forensics expert.
Our focus will be to navigate through the macOS landscape using Volatility 3, unveiling the procedures to extract, analyze, and interpret the volatile data that resides within. Whether you are a seasoned professional or an enthusiastic novice in the field, this guide aims to equip you with the knowledge to perform memory forensic analysis on macOS systems effectively, using the advanced capabilities of Volatility 3. Let's delve into the intricacies of macOS memory forensics and uncover the digital fingerprints that cyber adversaries may leave behind.
macOS Forensics: Key Limitations
As we venture further into memory forensic analysis on macOS with Volatility 3, it is crucial to heed certain caveats that have emerged from extensive testing and experimentation. Here, I outline the key considerations to bear in mind before proceeding:
Compatibility Limitations with New macOS Versions: Through rigorous trials, it has been determined that Volatility 3 does not support the latest versions of macOS. The highest version that has been successfully analyzed is macOS 10.15.7 (Catalina). Attempts to run memory forensic analysis on subsequent releases, namely versions 11 (Big Sur), 12 (Monterey), 13 (Ventura) and the latest version 14 (Sonoma), have proven to be unsuccessful. This limitation is a significant consideration for forensic analysts aiming to work with contemporary macOS environments.
The Challenge with Apple Silicon Macs: Since the introduction of Apple Silicon in late 2020, there has been a paradigm shift in the underlying architecture of Mac computers. As of now, Volatility 3 does not officially support Macs equipped with the Apple-designed arm64 processors. While there are individual efforts underway to develop patches that could potentially extend support to arm64 architecture, these are unofficial and have not been conclusively verified for reliability or effectiveness.
These considerations underscore the current boundaries within which forensic practitioners must operate. It is advisable to remain vigilant for updates and community-driven solutions that may, in time, overcome these hurdles. For now, understanding these constraints is vital for setting realistic expectations when conducting forensic analysis on macOS systems with Volatility 3.
macOS Memory Dump Acquisition
The acquisition of a memory dump is a foundational step in forensic analysis, serving as the primary data source for the ensuing investigation. While tools like FTK Imager for Windows and lime or avml for Linux are well-established in their respective domains, the macOS landscape presents a different array of tools.
For those favoring open-source solutions, osxpmem stands out as a viable option. Available for download from the Velocidex GitHub releases page under Release 3.2 at osxpmem release on GitHub, this tool has been known to facilitate memory dumping for Intel x64 macOS versions ranging from 10.8 to 10.15. It represents a crucial bridge over the chasm that often separates forensic analysts from macOS data.
Volexity Surge Collect is noted as a commercial tool that claims to support macOS systems with Apple Silicon. However, as I have not personally tested this tool on such systems, I cannot vouch for its effectiveness or compatibility with the newer macOS versions. The actual performance of Volexity Surge Collect on Apple Silicon remains to be conclusively established through hands-on experimentation.
Given the landscape, this post will pivot towards a more universally applicable method: extracting the memory from a macOS instance running on a virtual machine. This approach bypasses the direct physical memory dump constraints by leveraging the virtualization layer to access the memory file, providing a consistent and reproducible means of acquisition irrespective of the underlying hardware. This method not only ensures broader applicability but also simplifies the process for analysts operating across diverse hardware configurations.
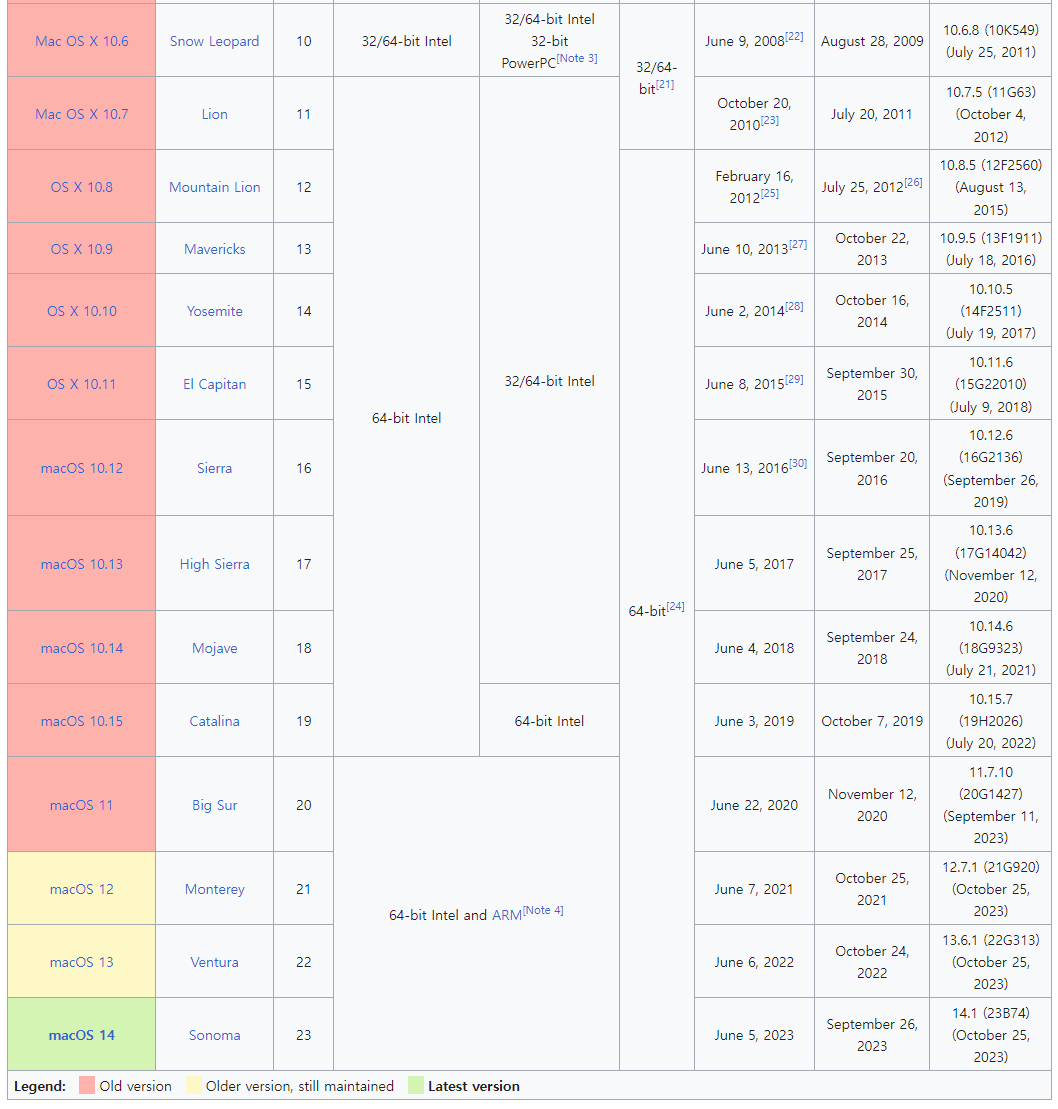
The chronology of Mac OS X, OS X, and macOS version information over the past two decades offers a window into Apple's strategic shifts in operating system development.
In my recent testing with VMware, I've examined the changes in macOS versions, particularly as they relate to forensic analysis. Apple's operating system versions have been known as Mac OS X, then OS X, and now macOS, with a consistent "10.x" pattern up until 10.15 Catalina. Post-Catalina, Apple has adopted a new versioning scheme with 11, 12, 13 and the latest 14. This isn't just a change in nomenclature; there are significant alterations in the forensic structure of the operating system as well, especially with the integration of Apple Silicon starting with macOS Big Sur.
My investigations into the latest macOS versions, Ventura and Sonoma, revealed that the current forensic tools are not compatible with these recent releases. This substantial structural evolution presents new challenges for memory forensic analysis. Consequently, this post will be centered around macOS 10.15 Catalina, the last version before these extensive changes, to ensure that the methodologies discussed are valid and executable with the existing forensic tools.
The wealth of online tutorials now makes it easier than ever to run macOS on Intel Windows machines through VMware or VirtualBox. I tapped into this knowledge base for my virtual forensic work, specifically utilizing resources from shaadlife.com to download a macOS Catalina ISO for setting up my virtual environment. This site proved invaluable in facilitating the creation of a stable macOS virtual machine for my testing purposes.

Apple stipulates that the macOS Catalina demands at least 4GB of memory to operate effectively. In setting up a VMware virtual machine for forensic analysis, it is essential to align with this requirement, assigning at least the minimum recommended memory. Adjustments to the virtual machine's memory allocation should be made with care; they cannot be altered while the machine is active and must instead be configured prior to booting up the system.

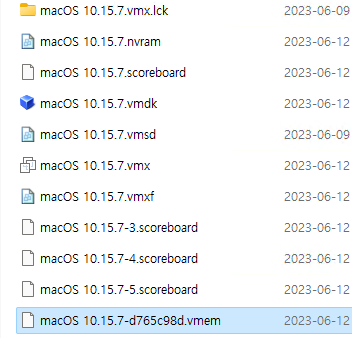
When it comes to capturing the memory for analysis, VMware offers a straightforward method. By suspending the virtual machine, a file with a '.vmem' extension is generated within the VM's directory. This file essentially holds the suspended state of the machine's memory. If the virtual machine's RAM was set to 4GB, the resulting '.vmem' file will be roughly equivalent in size, providing a direct image of the machine's working memory at the time of suspension.
For those who may be seeking a straightforward exercise to practice their skills, I'd like to recommend an excellent example. During the Securinets CTF Quals 2019, there was a challenge that involved macOS memory forensics. If you're interested in downloading this challenge to try your hand at it, please refer to the website Securinets CTF Quals 2019 for more information.
Generating ISF Files for macOS Analysis
Volatility 3 has evolved from the concept of profiles, familiar to users of Volatility 2, to a new system that utilizes symbol tables for memory analysis. This shift reflects a change from the fixed profiles to a more dynamic approach of interpreting symbols within the macOS kernel. The tool parses through the kernel's symbol information, extracting data and encapsulating it in the Intermediate Symbol Format (ISF), tailored for macOS analysis. The ISF files are thus pivotal for analyzing macOS memory dumps, replacing the previous reliance on profiles.
To obtain an ISF file suitable for macOS, there are two primary methods. Analysts can either leverage an existing ISF file, if available, or generate a new one specifically for the macOS version in question. Generating an ISF file requires access to the appropriate symbol information from the macOS kernel, which can then be processed by Volatility to facilitate the forensic analysis.
1) Downloading Pre-Generated ISF Files for macOS from Volatility3 GitHub
To procure an ISF file for macOS using Volatility 3, one straightforward method is to download pre-generated files from the developers' repository on GitHub. The necessary ISF files can be found at https://downloads.volatilityfoundation.org/volatility3/symbols/mac.zip. These files should be saved directly under the volatility3/symbols directory. There's no need to manually extract the zip file or create additional directories, as this is handled automatically.

Regrettably, as of the latest check since June 22, 2020, it appears that the GitHub downloads provided by the Volatility developers have not been updated. The files included within suggest support starting from Mac OS X Snow Leopard 10.6, released in 2009, with the ISF file for macOS 10.15 Catalina being the latest version available. If the specific version you require, such as 10.15.7 (19H15), is not present among the officially supported ISF files from Volatility, then you will need to generate the ISF file yourself.
2) Create a custom file using the dwarf2json tool
In the event that the required files are not available on the ISF server, it becomes necessary to generate them independently. For this purpose, a tool named dwarf2json is provided. For a comprehensive explanation, consult the Creating New Symbol Tables page (volatility3.readthedocs.io/en/latest/symbol..).
dwarf2json is a Go(1.14+ required) utility that processes files containing symbol and type information to generate Volatility3 Intermediate Symbol File (ISF) JSON output suitable for Linux and macOS analysis.
$ git clone https://github.com/volatilityfoundation/dwarf2json.git
$ cd dwarf2json/
$ go build
$ ./dwarf2json --help
Usage: ./dwarf2json COMMAND

A tool for generating intermediate symbol file (ISF)

Commands:
  linux  generate ISF for Linux analysis
  mac    generate ISF for macOS analysis
Now, with this program, you can create an ISF file format. There are two components required for creating an ISF file:
Kernel Debug Kit(KDK)
/System/Library/Kernels/kernel
Let's then turn our attention to the process of creating ISF files ourselves using dwarf2json.


First, it's essential to precisely identify the version and kernel build version of the operating system. While we commonly refer to it as Catalina, a closer look reveals detailed specifications such as 10.15.7. Furthermore, by examining the System Software Overview section, one can find a codename, such as 19H15. These details should be noted down, as they are critical for generating an accurate ISF file.
You can obtain the official Kernel Debug Kits (KDKs) from the Apple Developer Site (https://developer.apple.com/download/all/), though you will need to log in with your Apple account. It's important to note that while Apple provides a substantial number of KDKs, they do not offer them for every operating system version. If Apple does not provide a KDK for your specific version, it would be impossible to generate an ISF file for that version. After extensive experimentation, I managed to obtain the KDK for version 19H15, and, fortunately, Apple had made the required KDK available for this version.

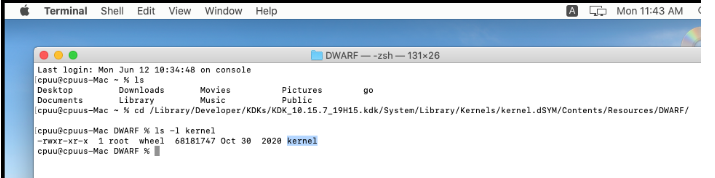
I downloaded and installed the dmg file for KDK 10.15.7 build 19H15. Upon completion of the installation, you will find a file named 'kernel' at the following path: /Library/Developer/KDKs/KDK_10.15.7_19H15.kdk/System/Library/Kernels/kernel.dSYM/Contents/Resources/DWARF/kernel. This file is essential for creating the ISF file.
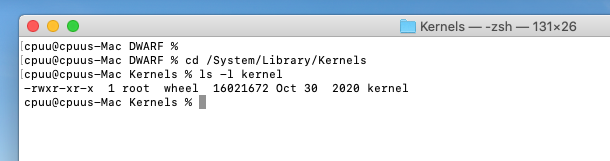
The second requirement is the actual kernel file from the current system, which can be located at the path:
/System/Library/Kernels/kernel
Now, using the kernel debugging symbol file and the kernel file you've previously located, you can execute dwarf2json as follows.
cpuu@cpuus-Mac dwarf2json-master % ./dwarf2json mac --macho /Library/Developer/KDKs/KDK_10.15.7_19H15.kdk/System/Library/Kernels/kernel.dSYM/Contents/Resources/DWARF/kernel --macho-symbols /System/Library/Kernels/kernel > macos10.15.7_19H15.json
The file produced through this process is the ISF.
With this file in hand, you can analyze memory dumps extracted from the macOS Catalina operating system. This file needs to be moved to the symbol directory. In my case, the path is as follows: /Users/cpuu/Documents/volatility3/volatility3/symbols. Files placed here are automatically analyzed by Volatility, which then utilizes the appropriate version for the analysis.
Plugins for macOS memory forensics
Now that you have secured the ISF file (either downloaded or created yourself), let's start using plugins to perform a forensic analysis on the memory image.
The full list of plugins for macOS is as follows:

I have contributed to the community by detailing how to analyze macOS memory images using Volatility 3, including the use of various plugins, in a tutorial titled "macOS Tutorial" in the official Volatility 3 documentation. Those interested in learning more can refer to the guide at macOS Tutorial on Volatility 3 documentation.
From my perspective, the macOS plugins for Volatility 3 leave something to be desired. It appears that many features that were supported in Volatility 2 have not yet been ported over to Volatility 3. In fact, I've taken an active role in addressing these gaps, having submitted a Pull Request for the mac.pslist.PsList plugin on GitHub which was subsequently merged. I encourage others, if given the opportunity, to contribute to such enhancements as well.
Conclusion
In conclusion, our discourse on memory forensics has shone a light on the complexities of using Volatility 3 for macOS. This journey started with the foundational discussions on Linux memory analysis and has now expanded to embrace the challenges and methodologies particular to macOS. Along the way, we’ve covered the transition from traditional profiles to the more dynamic symbol tables, and the intricacies of acquiring and generating the necessary ISF files for analysis.
The field of memory forensics is constantly evolving, with tools like Volatility 3 spearheading innovation and research. As practitioners become adept at using this powerful framework, their capacity to dissect and interpret memory dumps grows, leading to sharper and more efficient forensic investigations. With the ongoing development of Volatility 3, the forensic community is encouraged to remain abreast of new advancements and to contribute to the collective knowledge base, ensuring that the tool’s evolution is as inclusive and comprehensive as the field it serves.

![[Book Review] Hacking APIs](/_next/image?url=https%3A%2F%2Fcdn.hashnode.com%2Fres%2Fhashnode%2Fimage%2Fupload%2Fv1691992782649%2F8c13c6f2-bf1c-4042-8082-da97074cecdb.png&w=3840&q=75)
![[Book Review] Linux Basics for Hackers](/_next/image?url=https%3A%2F%2Fcdn.hashnode.com%2Fres%2Fhashnode%2Fimage%2Fupload%2Fv1686639994828%2F255a4c9e-9ff0-414f-97c3-804b99f3e12d.jpeg&w=3840&q=75)
![[Book Review] Black Hat Python, 2nd Edition](/_next/image?url=https%3A%2F%2Fcdn.hashnode.com%2Fres%2Fhashnode%2Fimage%2Fupload%2Fv1685081315794%2F260f0d5f-db1e-4604-bac3-0901c517fb8f.png&w=3840&q=75)